Heat treat oven - electric
Making my DIY heat treat kiln
I started this build back in summer 2016 by buying all the necessary parts for the kiln: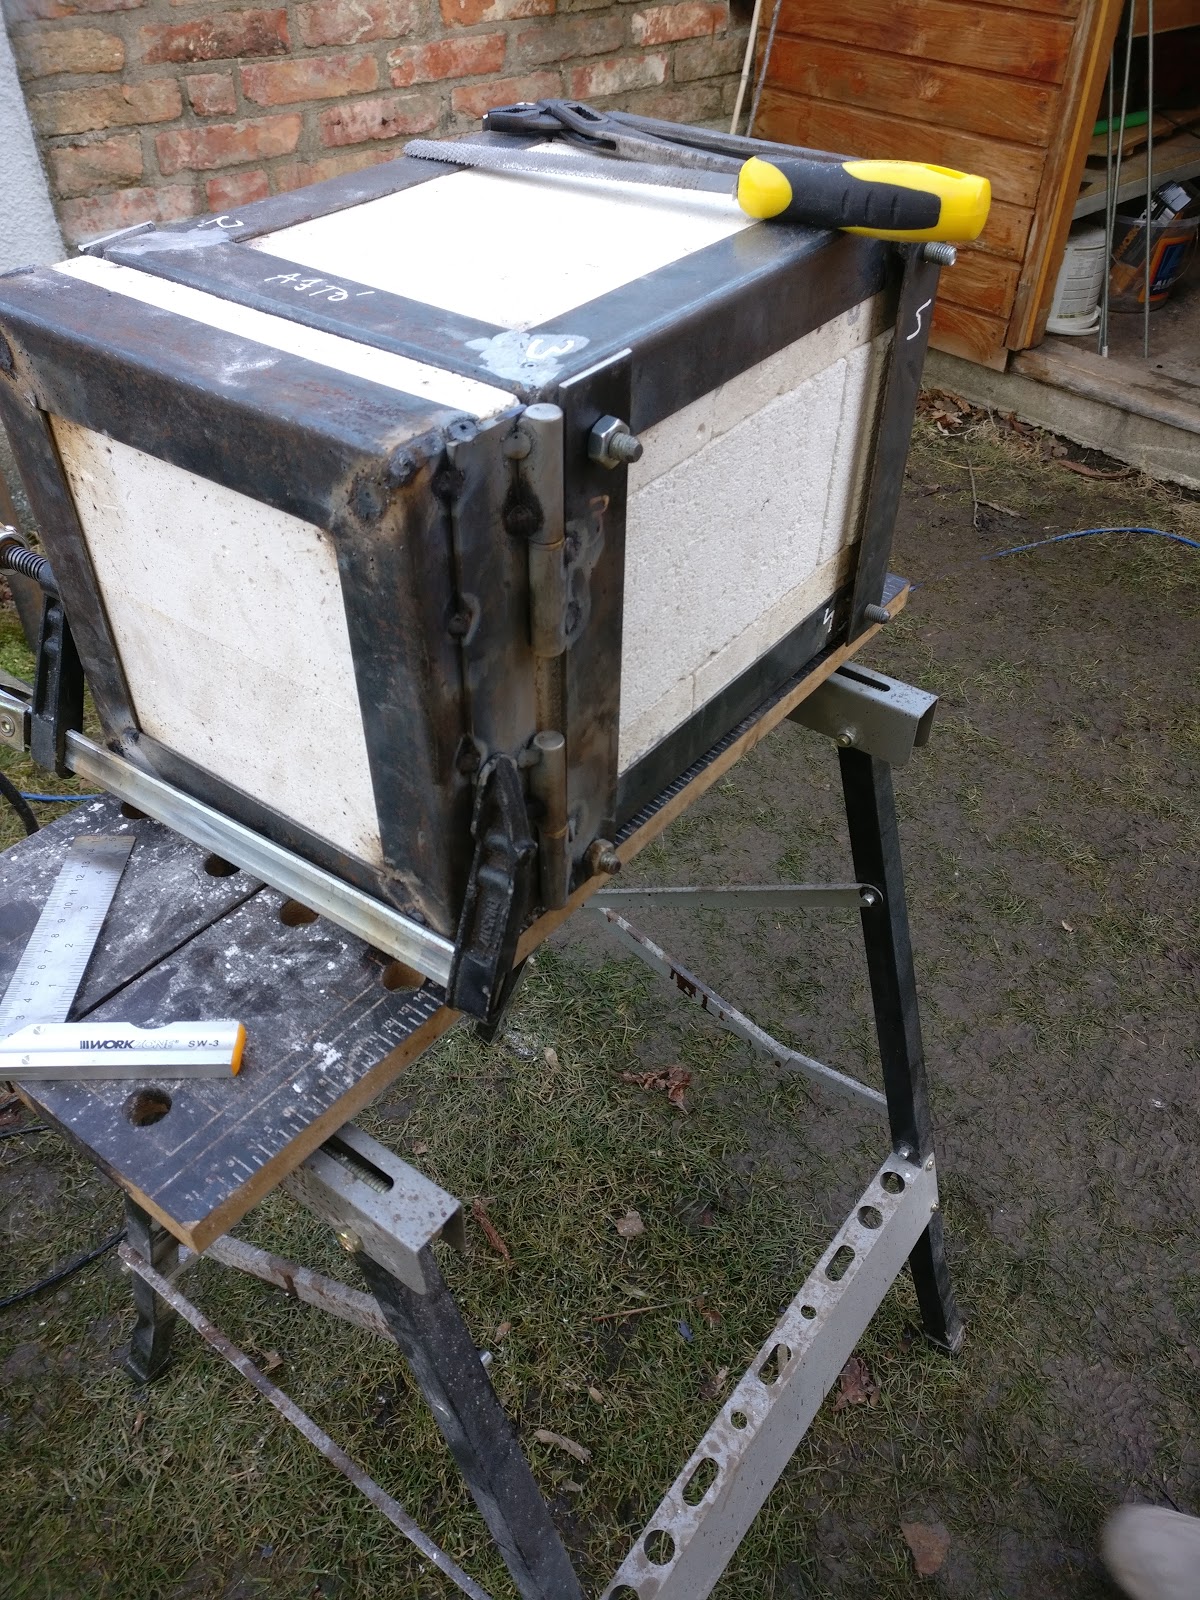 | ||
| Close to finish |
- Heating element (wire coil, 80cm long, 5mm thick, rated 3.500W)
- PID Controller: Rex C100 + 1.250C K-type thermocouple
- Solid State Relay (SSR, 25Amp)
- Aluminum heat sink for SSR
- Old PC fan and box
- 1.200C for the top, bottom and the door of the kiln, theese bricks will not touch the heating element
- 1.500C for the walls, theese will incorporate the heating wire
- Some angle iron (40x40x2mm)
- Door hinges
 |
| Basic layout of DIY heat treat kiln |
Basic layout
I started assembling the core of the kiln. I used a Dremel 566 attachment to shape the groove, accomodating the heating element. I had to cut one thick brick in half, you can see it in the following picture, where one half of the cut piece is in the middle of the floor and the other in the roof ot the heat treating kiln.
 |
| Bottom assembly of heat treat |
Bottom assembly.
We had to change plans after starting the build. Originally we went for a fully welded frame, but eventually opted for a take-down roof/walls.
The screws you see here on the bottom part are for fixing the whole kiln together.
A friend of mine came over to help me out, he knows how to weld (or at least has a welder :)

Final shape
We cut the 40x40x2mm angle iron to 45degrees, welding it together and creating a sturdy base
Next step here is to drill each vertical support to matching size.

Welding the door
Well, it is what it seems to be.. welding the door frame of the DIY heat treat kiln.
You might want to turn the sound on for the next video. Some strange noises are made by the door. (or rather by my friend?!?!?!)
BTW... never let a left hended friend make your DIY heat treat kiln door, in case you are right handed.
I have to live with this for the time being. 👍

One mean back plate 😈 😈 😈 😈 😈 😈
😂 😂 😂 😂 😂
UPDATE 26/07/17: I had to make all slots for the heating element deeper, about 7mm deep, and 6mm wide, to accomodate the wire. Before that at every ramp-up I have lost a heating coul due to the wire falling out and shortcuting itself.
First test
First ramp up. I set the Rex C100 to 1050C, but it seemy so turn off the heating at 1010C. After setting it to 1090, it did a perfect 1050C

Wire ruined
I drilled a hole through the back wall, and drove the coil through it. After the kil was open for a few minutes, and the wire cooled down already, you can see the coil in the hole still glowing red hot.
It has melted itself, and broke down by its own weight.
I had to use the 2nd wire (purchased a set of two) for the repair, since this one tends to break in case you dare to bend it.

Electrical issue repaired (or not??)
This is one is a typical, and not too rare "or not" case.
I drowe a 5mm diameter allthread through the brick, used two nuts and some washers on the inside to fix the Nichrome wire.
On the outside I used two oversized washers to prevent the allthread from slipping in.
As you can imagine, it blew the fuse a few times, when my friend figured the issue. I bet you can find the issue on the picture. 😓😓😓

Control box
I have used a salvaged and gutted PC power supply box for the electrical components.
The PID receives power through the PC mains connector, and it is wired to the SSR.
The SSR does receive current from a separate source, so to operate the equipment, I need two electrical outlets. I opted for this soulution, because I did not want the full current (loaded with 3.200-3500W heating element) go through the same connector as the PID goes
The SSR is mounted w heat transfer paste to the aluminium heat sink and placed directly under the cooling fan.
The cooling fan is wired to the PID's SSR-out, where it releases 12V DC

Ramping up
The kiln heats up to 1050C in 10 minutes.
Untill ~700C it goes very fast, as seen on this video, from 700C on it takes more time.
I'd say, 10C => 700C it took 4 minutes, and 700C => 1050C another 6 minutes.
I had no time (and no ready blade) to really use it for heat treat yet, but time shall come!
There is still a lot to do:
- Finalizing and insulating the electrical connections
- Building a safety switch on the door, so in case I open the door, the Nichrome wire should not be under load (and electrocute the s@it out of me in case I touch it w the heat treated blade
- Mounting the control box on the DIY heat treat kiln
- Securing the heating wire to the wall

First testing with a dummy blade
I turned the heatting element off, so I dont get killd in case I touch the wire.
And as Murphy prognosed: I did touch the freaking wire.
UPDATE 26/07/17: After making the slots for the coul deeper, the ramp.up is way slower, it takes about 60min to reach 1.100C, but there is also a gain: The temperature fluctuation inside stays between 2-4C difference from the tem i have set. Before this, there was a slight 40-60C fluctuation :D:D


Comments
Post a Comment